top of page

Getting Started
AI Extraction + Auto Ballooning
Inspection Templates
Importing Balloons
While you can use the included inspection templates for exporting your balloon data, you can also create your own. Creating your own templates is incredibly simple with just a few requirements to make them work. Read below to see the requirements.
Balloon Characteristics Labels Table
1. Your Inspection Template must contain key labels for the type of data you want exported and must be a .xlsx or .xlsm file.
(See labels table to the right).
2. The labels must have a "START" and "END" label on the same column.
(See Example 1 image down below).
3. Save your Inspection Template .xlsx or .xlsm file to the "export templates" folder.
Click "Export" on the BalloonX app, then click the "..." button to go to the export templates folder to put your template in.
4. SIMPLE AS THAT!
5. See the list of valid key labels that can be used on the table to the right.
Note #1: When Exporting, additional rows will automatically be created if there are not enough rows for your balloon data!
Note #2: When Exporting, the formatting for the cells used will be whatever you set your template to have.
For example, to ensure trailing edge zeros aren't dropped ensure your columns are set to "Text" instead of "General"

Designator | Label Name |
|---|---|
Balloon Numbers Start | BalloonNumberExport_Template_START |
Balloon Numbers End | BalloonNumberExport_Template_END |
Reference Location Start | BalloonRefLocExport_Template_START |
Reference Location End | BalloonRefLocExport_Template_END |
Requirement Start | BalloonReqExport_Template_START |
Requirement End | BalloonReqExport_Template_END |
Characteristics Start | BalloonCharExport_Template_START |
Characteristics End | BalloonCharExport_Template_END |
Nominal Start | BalloonNomExport_Template_START |
Nominal End | BalloonNomExport_Template_END |
Lower Bound Start | BalloonLowExport_Template_START |
Lower Bound End | BalloonLowExport_Template_END |
Upper Bound Start | BalloonUpExport_Template_START |
Upper Bound End | BalloonUpExport_Template_END |
Low End Tolerance Start | BalloonLowTolExport_Template_START |
Low End Tolerance End | BalloonLowTolExport_Template_END |
Upper End Tolerance Start | BalloonUpTolExport_Template_START |
Upper End Tolerance End | BalloonUpTolExport_Template_END |
Qualified Tool Start | BalloonToolExport_Template_START |
Qualified Tool End | BalloonToolExport_Template_END |
Comment Start | BalloonCommentExport_Template_START |
Comment End | BalloonCommentExport_Template_END |
Combined Tolerance Start | BalloonToleranceExport_Template_START |
Combined Tolerance End | BalloonToleranceExport_Template_END |
Combined Bounds Start | BalloonBoundExport_Template_START |
Combined Bounds End | BalloonBoundExport_Template_END |
Project Information Labels Table
Designator | Label Name |
|---|---|
PO number | ProjectExport_Template_PO |
Supplier | ProjectExport_Template_Supplier |
Customer | ProjectExport_Template_Customer |
Drawing Revision | ProjectExport_Template_DrawingRevision |
Drawing Number | ProjectExport_Template_Drawing |
FAIR Identifier | ProjectExport_Template_FAIReport |
Part Name | ProjectExport_Template_PartName |
Part Revision | ProjectExport_Template_Revision |
Part Number | ProjectExport_Template_Part |
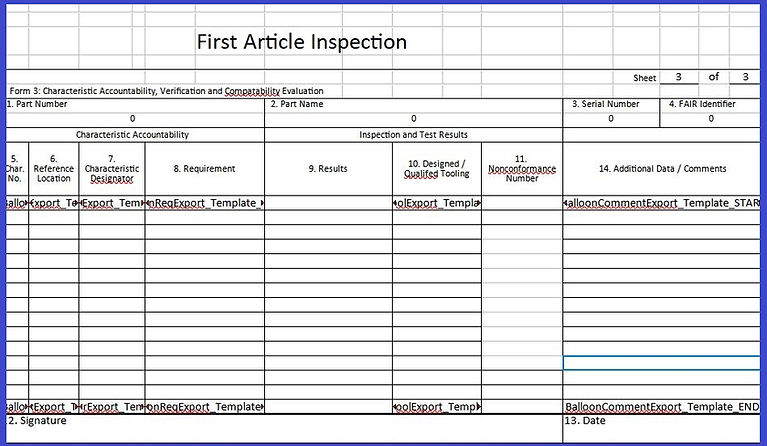
Example 1; Template With Key Labels
If you already have ballooned PDF files from using other software such as Discus or InspectionXpert, use this guide to help transition your ballooned files to BalloonX!
Video Instructions
Step 1: Start New Project and open the non-ballooned PDF you want to import balloons on
From here you have 4 options that you can use to extract the balloons from your previously ballooned PDF file(s), I will explain each option available.

Option 1 ---- "Balloon Annotations":
If the PDF file contains the balloons as annotations, then use "Balloon Annotations" and select your ballooned PDF file in the popup and the balloons will automatically transfer.
Hint: If the balloons are saved as annotations on the PDF file, you will be able to move the balloons around on the PDF file.
If you cannot move the balloons around on the PDF, then the balloons are baked into the PDF and are not annotations. If this is the case, try the other 3 options!

Option 2 ---- "Balloon Text Automatic":
Ballooning software generally adds the balloon text to the end of the PDF file and sometimes the balloon text is in between 2 static text lines.
You can go to Edit --> Settings --> Import options --> View PDF Text, in order to see if the balloon numbers are always in between 2 sets of text.
In this example, the balloon number text is in between "Printed Copies Uncontrolled" and "Ballooned By InspectionXpert 2.0"

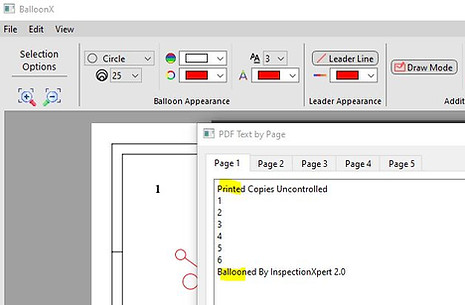
As you can see, in the Settings -> Import Options, the 'Beginning Text' is set to 'Printed Copies Uncontrolled' and the 'End Text' is set to 'Ballooned By'. Therefore, in this example since the 1-6 balloon numbers are in between those text, using the 'Balloon Text Automatic' option will add those balloons to our file.
If this option seems a bit complicated, see the next 2 options!
Option 3 ---- "Balloon Pick Manual --> Text Only":
Using this option, will simply give you a list of the text, by page, to select from. Based on your selection, balloons will be added to your project at the location this text appears in the PDF you are importing from.
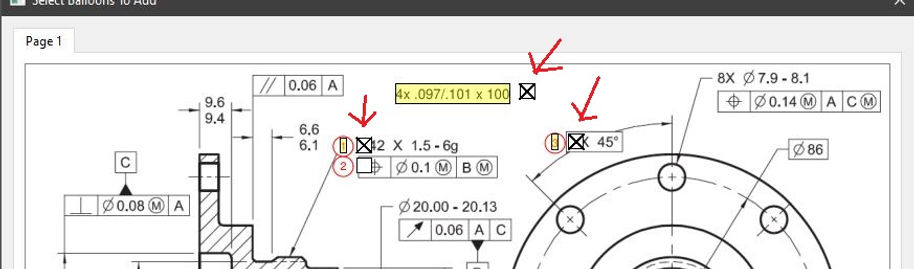
In the below example, the text in the PDF file corresponding to the balloon numbers is "1, 2 and 3", by selecting these and hitting okay, balloons will be added to our project at the same locations as on the original PDF file.
Note: You can hold shift while selecting with mouse to select more than 1 at a time.
For an even easier option, see option 4!
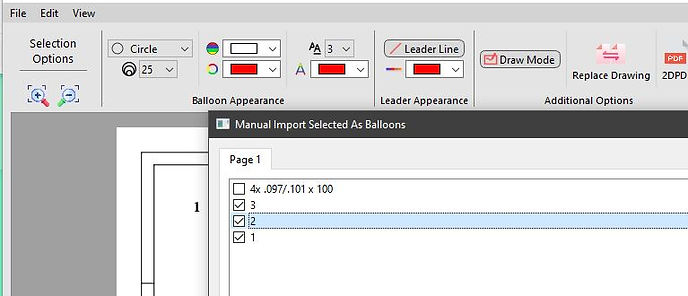
Option 4 ---- "Balloon Pick Manual --> Visual":
This option will show you the PDF you want to import balloons from, with checkmarks next to each section of text in the PDF. Whatever you checkmark, will be highlighted and will be the balloons that will be imported into your project at the same locations!
In the below example, I checkmarked the following in the window. After hitting okay, balloons will be added at these locations in our project.
Note: You can create a box to multiselect more than 1 at a time with the mouse
This option is by far the easiest and most intuitive to use!
Gemini AI Extraction and Auto Ballooning
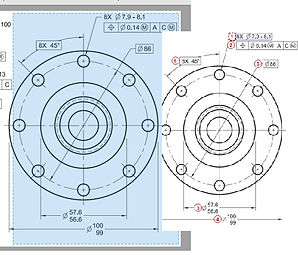
AI extraction of dimensional characteristics and for AI auto-ballooning accuracy will vary and may vary based on the structure and quality of the source data or drawing. For example, drawings that are PDF scans which have reduced clarity will have less accuracy extracting the dimensional characteristics and auto ballooning. See the examples below.
Non-Scanned drawing, higher quality

Scanned drawing from a printer, reduced quality

AI Extraction Tips
After creating a box around the dimension, if the AI extraction didn't populate the dimensional characteristics the way you expected, try the following:
1) Move or resize the box slightly and then click the "Re-run OCR" button next to the image preview in the properties window. Changing the image slightly by moving or resizing the box will help the AI return different results.
2) If the dimension is vertical, click the rotate button next to the image preview then click "Re-run OCR".


Auto-Ballooning Tips
This feature with BalloonX currently only supports auto ballooning dimensions. The recommended usage is to auto balloon individual detail features at a time. In this way, you will be able nicely balloon the feature details in a clockwise or counter clockwise fashion.
Auto-Ballooning Accuracy
Auto Ballooning is even more sensitive to the quality of the source drawing.
The accuracy of the auto ballooning will also vary greatly depending on the style of the source drawing vs what the auto ballooning model was trained on.
You can check for updates to the auto ballooning model in Edit --> Settings --> Auto Balloon Options.
By clicking on the "Check Model Updates", any updates to the auto-ballooning will be automatically downloaded and installed.
bottom of page